Water heater article archive
Water Heater Checkup: Proven 20-Minute Yearly Maintenance Guide
Historical article, not newly reviewed advice. Verify current requirements, incentives and model guidance with the relevant authority or manufacturer before relying on them. Equipment and service needs require an assessment.
📋 Table of Contents
According to the U.S. Department of Energy, water heating is the second largest expense in your home, accounting for roughly 18% of your utility bills. Performing a water heater checkup once a year isn't just a chore; it’s a strategic move that can prevent a $2,000+ premature replacement bill.
Here’s the thing: most homeowners ignore their water heater until they’re met with a cold shower or a flooded garage. But for a busy marketing manager or a startup founder in the Bay Area, time is the most valuable currency. You don't need a half-day DIY project; you need a high-impact, 20-minute routine that keeps your home running efficiently.
- Flushing sediment once a year can improve energy efficiency by up to 15%.
- Testing your T&P valve prevents dangerous pressure build-up.
- Checking the anode rod is the single best way to stop tank corrosion.
- Heat pump models require a specific 2-minute filter cleaning step.
1. The Strategic Value of a Water Heater Checkup
Think of your water heater like a high-performance engine; if you never change the oil, it will eventually seize up and fail when you need it most. A consistent water heater checkup acts as an insurance policy against the hard water common in many Bay Area cities.
What most people miss is that sediment—minerals like calcium and magnesium—settles at the bottom of the tank. This creates a barrier between the burner and the water, forcing the unit to run longer and hotter. In our work with typical Bay Area mid-market residents, we’ve seen units fail in just six years due to sediment neglect, whereas a maintained unit easily hits the 12-year mark.
- Lower Bills: Removing sediment means the heating element works less.
- Noise Reduction: That popping sound you hear? That’s trapped steam bubbling through sediment.
- Reliability: You catch small leaks before they become catastrophic floods.
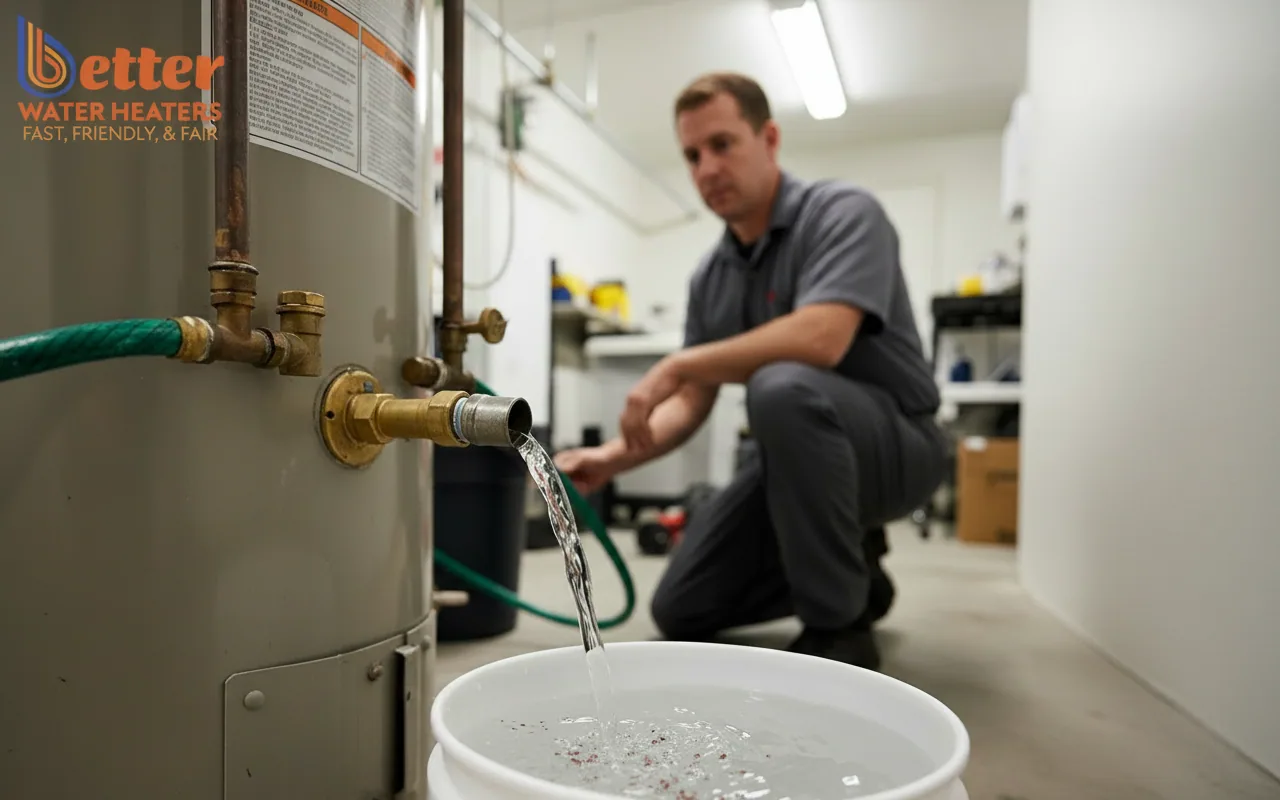
2. How to Flush a Water Heater in 10 Minutes
The core of any water heater maintenance routine is the mini-flush, which clears out the heavy mineral deposits at the base of the tank. You don't actually need to drain the entire tank to see massive benefits.
But wait—before you start, make sure you know where your shut-off valves are. For gas units, turn the thermostat to 'Pilot.' For electric units, turn off the breaker to prevent burning out the upper heating element. To learn more about specific model requirements, you can search our guides for your specific brand.
- Attach a hose: Connect a standard garden hose to the drain valve at the bottom of the tank.
- Open the valve: Direct the other end into a floor drain or a large bucket.
- Run the water: Open the drain valve for about 2-3 minutes until the water runs clear.
- Check the sediment: If the water is milky or contains "sand," you’ve successfully removed scale.
Pro Tip: If the water doesn't flow, the valve might be clogged with debris. This is a sign you need a professional to perform a deep descaling. Need a hand? Schedule your professional flush here.
3. Testing the T&P Relief Valve for Safety
The Temperature and Pressure (T&P) relief valve is the most important safety feature on your unit, designed to prevent the tank from exploding if pressure gets too high. Testing this valve during your water heater checkup is non-negotiable for safety.
The real kicker? These valves can often get stuck due to mineral buildup, rendering them useless. To test it, simply lift the lever briefly and let a little water discharge into the overflow pipe. It should snap back into place and stop the flow immediately.
Warning Signs:
- The valve is leaking or dripping constantly.
- The lever is stuck and won't move.
- Water continues to flow after you release the lever.
If any of these occur, stop immediately. A faulty T&P valve is a high-priority repair that requires a licensed technician to ensure your home stays up to California plumbing codes.
4. Checking the Anode Rod: The Silent Protector
The anode rod is a sacrificial piece of magnesium or aluminum that attracts corrosive elements so the tank doesn't rust. According to Energy.gov, replacing a spent anode rod can double the life of your tank.
In our work with Series B SaaS founders who value data-driven home maintenance, we recommend checking the rod every 2-3 years. If the rod is rusted down to the core wire or covered in thick calcium, it’s time for a replacement. This is the "Inflation-Proof" hack: a $50 rod saves you a $2,000 replacement.
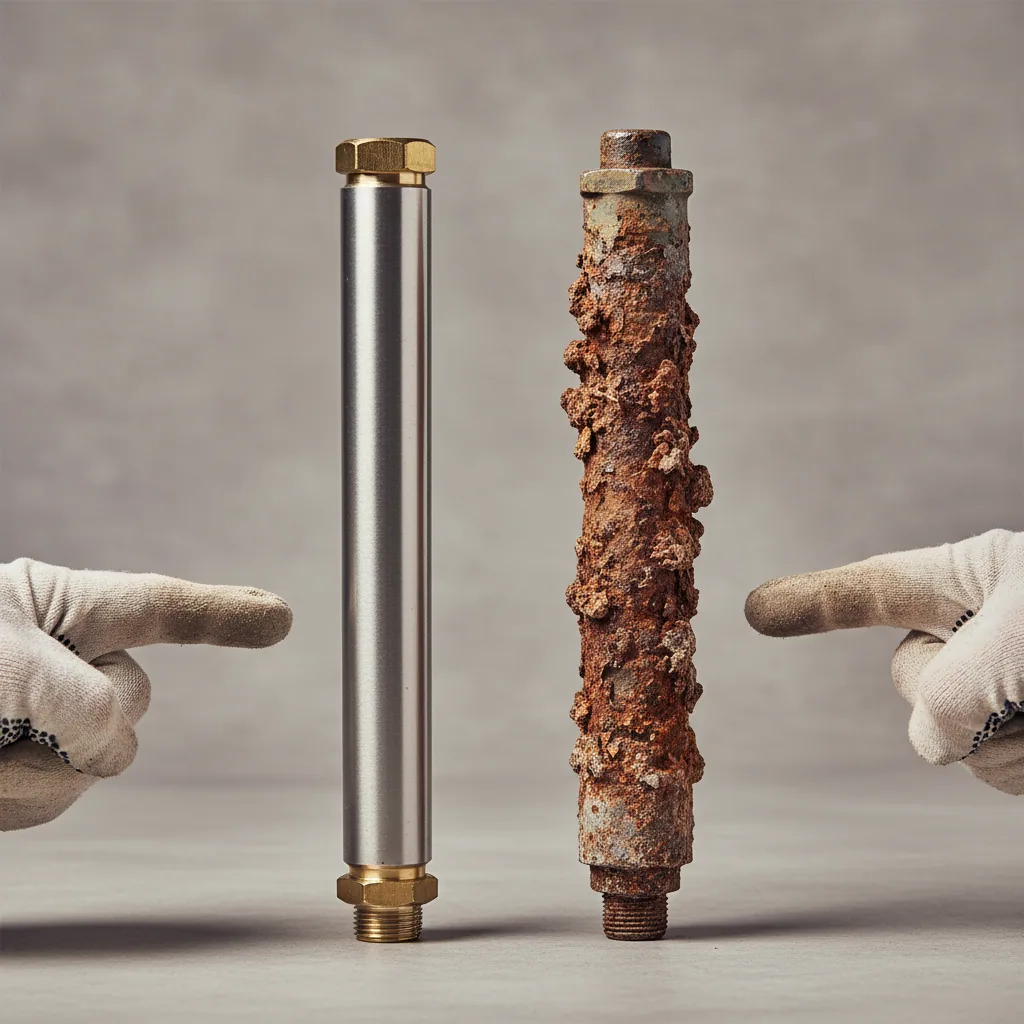
The Rotten Egg Smell: If your hot water smells like sulfur, it’s often a reaction between the anode rod and bacteria in the water. Switching to a zinc-aluminum rod usually solves the problem instantly.
5. Modern Maintenance: Heat Pump Air Filters
If you’ve upgraded to a high-efficiency heat pump water heater, your water heater checkup includes one extra step that traditional tanks don't have. These units pull heat from the air, which means they have an air filter that can get dusty.
A clogged filter reduces efficiency and puts strain on the compressor. Most Bay Area homeowners don't realize that this 2-minute task is the difference between an eco-friendly win and a service call. Simply slide the filter out (usually located on top), rinse it with water, let it dry, and pop it back in. It’s as easy as cleaning the lint trap on your dryer.
| Maintenance Task | Time Required | Benefit |
|---|---|---|
| Mini-Flush | 10 Minutes | Removes efficiency-killing sediment |
| T&P Valve Test | 2 Minutes | Ensures safety and pressure control |
| Visual Leak Check | 3 Minutes | Prevents catastrophic water damage |
| Filter Cleaning (HPWH) | 5 Minutes | Maintains high-efficiency airflow |
6. When to Stop and Call a Pro
While a DIY water heater checkup is great for preventative care, some issues are beyond the scope of a quick home audit. If you encounter any of the following, it's time to step back and call in the experts at Better Water Heaters.
- Active Leaks: If water is pooling at the base of the tank, the inner lining is likely breached.
- Gas Smells: Any scent of gas requires an immediate call to PG&E and a plumber.
- Scorching Marks: Dark marks near the base indicate "backdrafting," which is a carbon monoxide risk.
- Electrical Issues: Tripped breakers or charred wires on electric models are fire hazards.
Here’s an honest, contrarian insight: most "DIY" repair kits for water heaters are a waste of money. By the time a component like a heating element fails, the tank is usually close to the end of its lifecycle anyway. Investing in a new, high-efficiency unit is often more cost-effective than patching an 11-year-old tank.
For those managing multiple properties or high-volume marketing sites, maintaining consistency is key. Just as we use Ingest.blog as our internal AI content engine to keep our advice fresh and frequent, you should use a calendar reminder to keep your home maintenance on track.
FAQs About Water Heater Maintenance
How often should I really perform a water heater checkup?
For most Bay Area homes, once a year is sufficient. However, if you live in an area with particularly hard water, like parts of San Jose or Fremont, performing a mini-flush every six months can significantly extend the life of your heating elements and prevent heavy scale buildup.
Can I flush a tankless water heater myself?
Tankless units require a different process involving a submersible pump and food-grade white vinegar to descale the heat exchanger. While possible for a very handy homeowner, most manufacturers recommend professional descaling every 1-2 years to maintain the warranty and ensure peak flow rates.
What should I do if my water heater is making a popping noise?
A popping or rumbling noise is a classic symptom of sediment buildup. It happens when water gets trapped under a layer of scale, boils, and "pops" through. A thorough flush usually solves this, but if the noise persists, the scale may have hardened into a solid mass.
Is it worth repairing a water heater that is over 10 years old?
Generally, no. The average lifespan of a tank water heater is 10-12 years. If an older unit develops a major leak or a failed tank, the cost of labor and parts often approaches 50% of the cost of a new, more efficient model that comes with a fresh warranty.
Summary: Your Weekend Action Plan
Don't let your water heater become a "silent tax" on your home's efficiency. This weekend, take 20 minutes to hook up a hose, test your safety valve, and check for leaks. It’s the highest ROI task you can perform for your home’s plumbing system.
If you discover a leak, hear strange noises, or realize your unit is past its prime, don't wait for a flood to act. We specialize in Bay Area-specific regulations and can help you navigate the transition to high-efficiency models. Contact Better Water Heaters today for a professional inspection or a free replacement estimate.